Several years ago, I was inspired by some images I saw on a design blog’s e-newsletter. Iori Tomita, a Japanese ichthyologist, had composed a work he called New World Transparent Specimens. These illuminate a new world – one to which you may never have been privy.
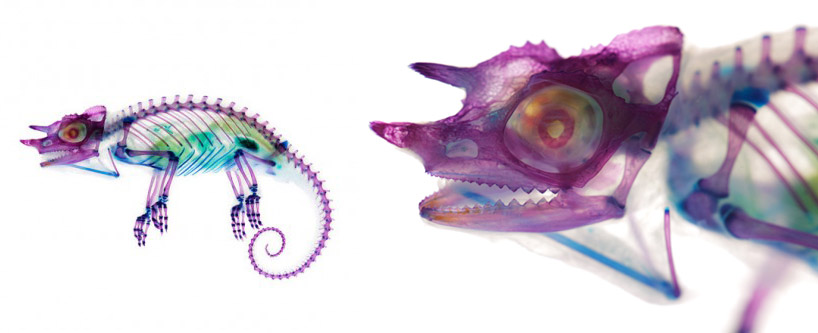
Image credit: Iori Tomita
I was completely blown away by the level of anatomical detail shown, and started looking into the process of creating these works of art. Diaphonization, or clearing and staining, is essentially a process through which tissue is turned transparent, cartilage is stained blue, and bones are stained red. I found that it is used to study anatomy and that there are standard protocols for performing this process in the lab, with only a few special chemicals required. Of course, I immediately turned to my lab’s PI to get the ingredients.

Image credit: Adam Summers
It was not nearly as cut-and-dry as we often hope lab protocols will be. Many of the steps in the overall process are quite forgiving, but you really must understand the rationale behind each step and the interaction between steps in order to not mess up the sequence of things and the resulting specimen.
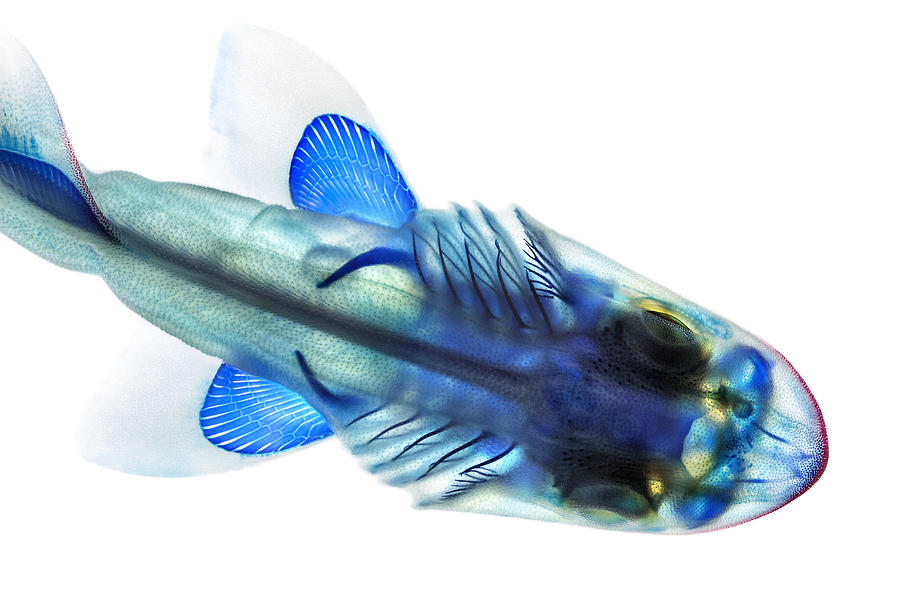
Image credit: Adam Summers
I often compare the laboratory to the kitchen. Cooks and scientists alike will browse existing protocols, taking note of reagents and methods used and try to understand how each of the steps contributes to the final product. Then, the best scientists (and cooks) combine the best practices from several different existing protocols, customized and enhanced to suit their own situation, to create a result that could never be produced in cookie-cutter fashion.

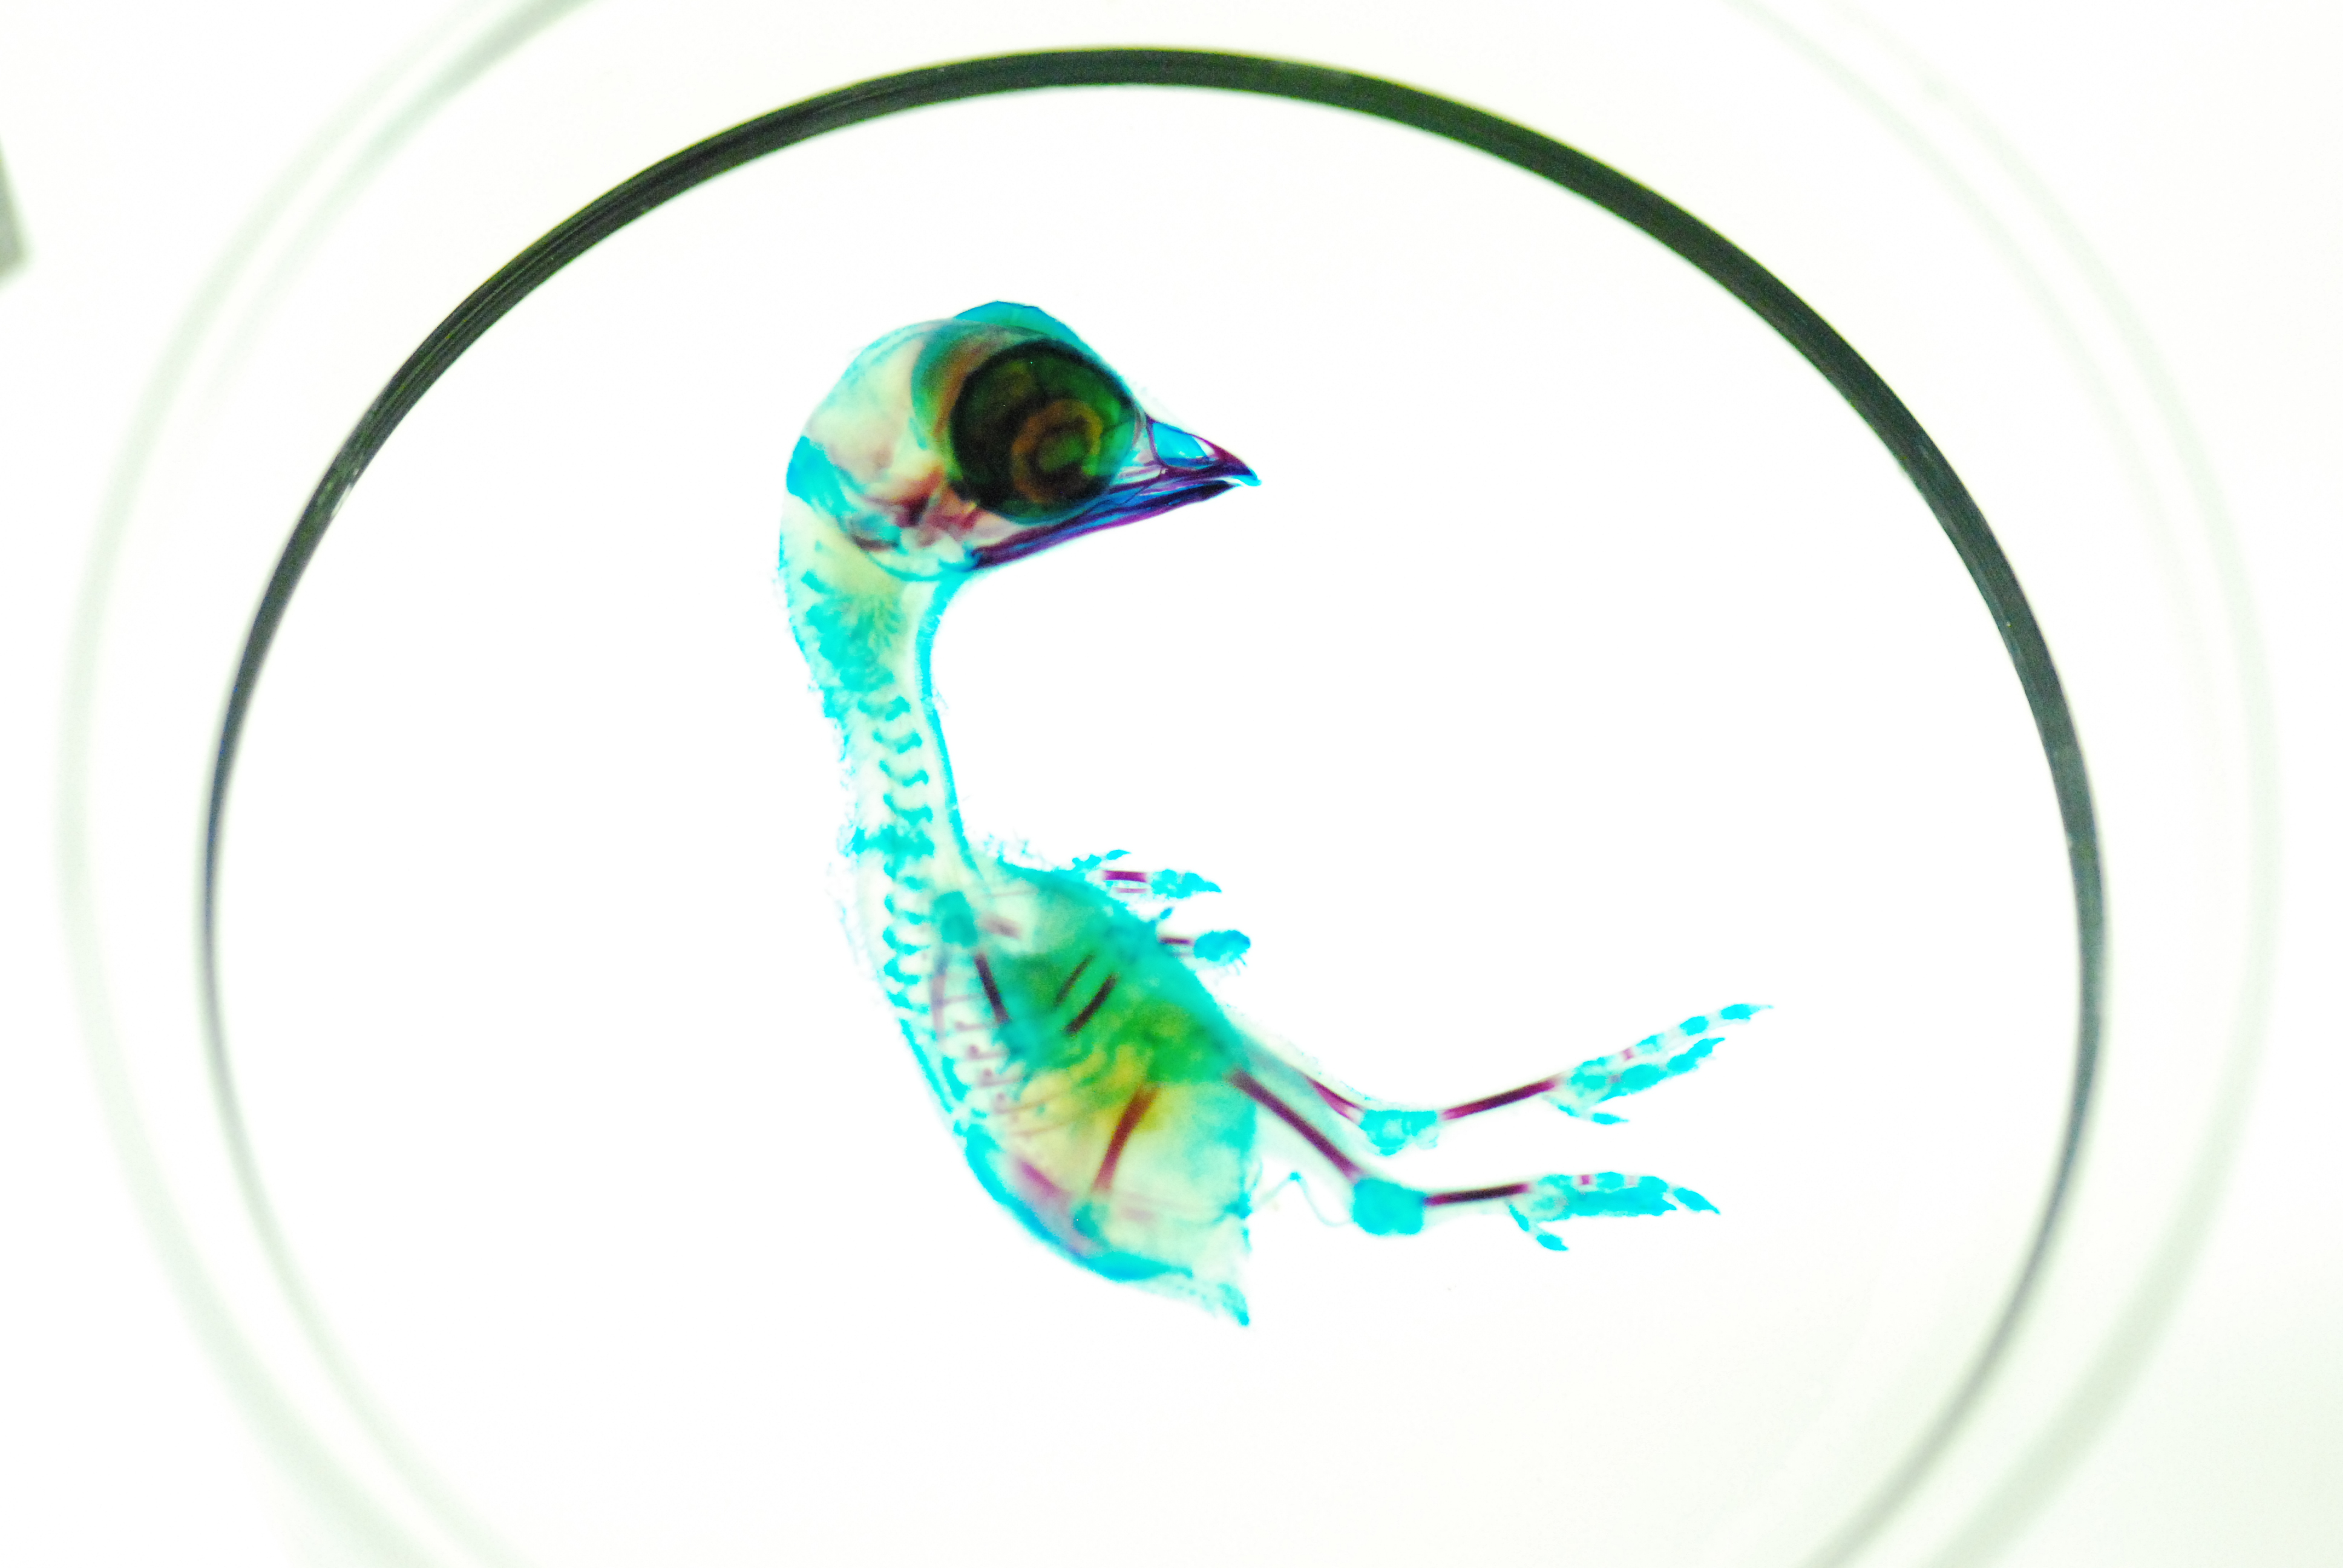
Image credit: Mike Klodnicki
The clearing and staining process is definitely an art. It is a time-consuming and painstaking process, and the slightest mistake can ruin a month’s work (and perhaps an irreplaceable specimen) in an instant. But seeing nature’s beauty revealed in such an amazing way makes all the effort worthwhile.

Budget macro photography is a post for another day.

I am doing a few specimens and all is going great but I would like to find out what other stains can be used besides the red and blue.I’ve seen pictures of specimens with orange ,green,and purple colors but can’t find anything about the stains used.
LikeLike
Green, yellow, and purple typically come from using different concentrations of the the red and blue stains. Visceral fat, if not removed/dissolved, can partially stain with each and show up as yellow.
This is why staining specimens is truly an art form – alizarin red S, if used in a very concentrated form, will be opaque, dark purple. If used in a more typical concentration, it will be red. Then, the length of time that the specimen sits in the stain will also affect the intensity (red vs purple shades).
There are, however, additional stains that can be used. For instance, there is a very expensive black stain (Sudan) that is specific to nerve tissue.
LikeLike
Hi!
I’m working with “large” entire arthropods [mainly insects], i would like to know if anyone has more background experience.
I understand that arthropods are not quite interesting for this technique, because the skeleton is outside of the body, but for academic research purposes, it’s very interesting.
Thanks.
LikeLike
Patience, patience…yes, ideally even the small specimens should be stepped up and down for hydration/dehydration steps. For the smaller ones you can usually get away with an hour or two per step, and doing a truncated series like: pure water, 30% EtOH, 60%, 95%. You can try going without graded series, but you may see negative results (non-turgid specimens with loose, wrinkly skin).
If you skin the specimen, you really have to do it (super-carefully) right before fixation. Then there will only be a small slit that does not affect overall shape. The specimen’s shape will then be *fixed* in place by formaldehyde/PFA. Once the specimen is further on in the process, key cross-linked proteins remain fixed and the opening will NOT increase in size. If you skin AFTER the fixation step, then these structural proteins will be damaged and the opening becomes a hemorrhaging tissue wound that greatly impacts specimen morphology.
Very true about the heat! Trypsin is heat activated, so it is much more efficient at around 37*C. This speeds up the trypsin step, but in my experience, makes it near impossible to catch at the right moment before overdigesting the specimen into soup. Maybe I just needed a desktop incubator…
If you’ve overstained a specimen, you can simply let the specimen sit in some very dilute KOH (0.5%) for a few days. Specimens are completely fine sitting for weeks in this solution. You’ll notice over time the stain precipitates to the bottom of the container, slowly leeching out of the specimen. Some stain will remain in the skin, so move on to the bleaching step once most of the excess stain is cleared (i.e., no more precipitate after changing the 0.5% KOH several times). Once the skin is opaque white, you can then move on to KOH/glycerol clearing.
FYI, If your red stain solution is completely opaque, you’ve mixed in too much powder. Hold it up to the light and make sure it is dark purple, but still lets some light through.
30% peroxide or bleach is ideal, but again, start with just a couple of drops or suffer the irreversible consequences: the dreaded bubbles.
LikeLike
Hi There,
I have to agree with Megan, it’s great to find someone who’s willing to share their experience of clearing and staining with people who don’t have a science background. It’s not the norm (as I’ve found out) so thanks!
I’ve had a few goes at this in the past and am currently trying to clear and stain some interesting fish donated by my local aquarium shop, plus a small snake and a lizard. There was a baby turtle, but alas his head and feet fell off due to my erroneous presumption he would need a more time in a stronger bleaching solution to deal with his shell. All seems to be going reasonably well for now, but I do have a couple of questions…
I too was wondering about an alternative to trypsin, because while it’s worked well for me in the past, it costs an arm and a leg (ask the turtle:) and is not the easiest thing to get hold of. There are lots of places to buy it online, but I am confused by the different grades available. As there’s a ginormous cost difference between the various types, should I buy the cheapest and hope for the best? I’ve seen trypsin tablets – supposedly to aid one’s digestion – and was wondering if these might work?? I once tried papain powder sold as meat tenderizer but it didn’t do a whole lot.
Another problem I often experience has to do with skin. Some protocols advise you to remove the skin, others say to leave it on to hold everything together at the end. I prefer the look of skin on, and these specimens are much easier to handle, but more often than not I find that the skin takes up so much dye (blue especially) that no matter what you try it’s never going to clear sufficiently. I’ve tried skinning at this point which often reveals bone or cartridge that’s not dyed strongly enough. ATM I have a small ray I skinned at the very end when it seemed the glycerin wasn’t helping make anything about him look translucent, only to discover the alcian blue had barely penetrated his tough skin (tho oddly the alizarin did) so all his cartridge was virtually unstained. He does look quite pretty with his feathery red bits none the less (will send photo when I work out how) so I don’t want to ruin him – So is it OK to jump back a few steps, or even go back to the beginning?
Perhaps the above problem is to do with the amounts of dye I’m using? Again I’ve come across very various ideas as to what’s best. Any thoughts or suggestions would be really appreciated!
LikeLike
I would avoid papain. Try using tissue-culture grade trypsin (1:250) – this should be one of the cheapest options.
Some of the best advice I’ve heard is to start small with the bleach solution. Start with only 1-3 drops of bleach per specimen. Let it sit 1-2 days minimum. If you go too long or too aggressive, it will destain everything, create bubbles within the specimen, and ultimately turn your specimen to soup. Be patient with this step. It’s critical.
If you skin the specimen, you need to do it early in the process, not at the end. It’s usually unnecessary. Do note, however, that thickness of the specimen will affect the time required for each solution to penetrate the tissue. Thicker specimens take relatively much longer time for each step.
If you’re not getting penetration of stains within a couple of days, then you’ve not made the tissue porous enough. Try a trypsin digest until the specimen is limp, and then go through the staining steps.
It’s perfectly fine to rework the whole process or specific parts of the protocol, but you need to be careful not to ‘shock’ the specimen during the rework (i.e., don’t go directly from 100% ethanol to 100% distilled water)
LikeLike
Hi again,
Thanks for your suggestions, it’s great advice! I’ve spent the last couple of weeks experimenting with some very cheap pilchards and a few other things and I’ve worked out the following:
Number one – patience is a virtue! I’m not sure I have enough of it, so my readiness to move on to the the next step too quickly was I think the reason for at least 60% of my problems. I love your analogy with cooking, but I took it too far – after all, your cake will be fine with a small pinch of added cinnamon, but it’s not going to work if you substitute an hour in a medium oven with 5 minutes at as hot as it will go! Also, I was in too much of a hurry to step up or down the alcohol so that likely didn’t help. Do small specimens really need to spend in excess of a day in up to four reducing or increasing concentrations?? That would really test my patience 😉
I was using waaaay to much of both dyes. Most protocols don’t really specify actual amounts, other than to say “not very much”, rather they talk about how it should look – and my idea of dark purple was really dark. I think this is why the skin and extremities died so deeply, and with the tissue not really broken down in any way it didn’t get much further. I’ve realized the skin does eventually become translucent so I’m leaving it on. I’m not evicerating specimens either, as in the later stages the opening from this tends to open right out, changing the whole shape of the fish (in this case).
Trypsin + heat = a very big difference! So it would seem does doing the bleaching before the trypsin. The only peroxide that’s easy to come by here (I live in Australia) is only 3%, so when I ran out of this I decided to improvise and use the stuff I dye my hair with as its around 30%, and a lot cheaper too. It’s been working very well so far….. And my next home lab substitution is…. Wound spray for horses! It contains rather a lot of trypsin, is really cheap, and it works a treat!
I’m still having trouble with a few specimens who’re at the end of the proceedings. Their tissue is very translucent and slippery, so I’m thinking much longer in either trypsin or KOH will result in a fish bouillabaisse, but the tissue still has just a little too much red staining for it to look really clear. I suppose there’s not much to be done to salvage a severely over dyed specimen, which is a pity because the bones look lovely!
Cheers,
Nicola
LikeLike
The spines are sure holding the blue dye. I’m just waiting and hoping that his body clears well. He’s the biggest fish I’ve tried to do. If he works I have a 3 ft skinny vine snake and a young monitor lizard to try next. I hope they turn out as well as the chicks you have pictured above. They’re beautiful!
One more question- Do you use thymol crystals in the glycerin you store specimens in? I read it is used to inhibit fungal growth for long term storage. Is fungal growth a common occurance, or can I go without the thymol?
LikeLike
No need for thymol. Just don’t leave finished specimens uncapped for any length of time.
Tissue thickness is the key issue. If the specimen is more 2 cm thick, things are going to get iffy. Solutions have a tougher time penetrating the entire thickness of larger specimens, so the time on each step will be have to be increased. Gutting the fish will help with solution penetration, but should be done immediately before fixation. You also have to take extreme care not to damage cartilage and bone structures. Minimal damage stands out when the specimen is cleared and stained :S
LikeLike
Megan,
Pancreatin actually contains trypsin as well as lipases, so it’s a likely substitute. I would be very cautious in finding the right concentration – start with too little, rather than too much, or you may end up with ‘bone soup’ instead of a partially digested specimen. Low concentrations + longer duration of digest gives you a larger margin for error. I’d love to see some of your specimens, and if you have any more questions just let me know.
LikeLike
Thank you for you feedback! Its so hard to find someone who will talk about their techniques and experiences. It’s apparently a big secret. I am working on a lion fish right now. I’m going to go and dilute the solution a little, per your suggestion, because I don’t really know the concentration of enzymes in the capsules I bought. I’ll let you know how it turns out.
LikeLike
I’ve been wanting to do a lionfish! I expect there is some ossification within their poisonous spines, so it could turn out gorgeous.
LikeLike
Hello,
I am learning to do this process. My first two specimens (frog and angelfish) turned out great. My second try wasn’t as much of a success. I am using specimens that are small enough to not need trypsin. I have seen on some other sites the mention on pancreatine as the digestive enzyme. Do you have any experience with this, or do you know if it can be used in place of trypsin? Any insight you have would be greatly helpful. Thank you.
LikeLike